


-

Sponsored
17:41 25th May, 2021
Wondershare Filmora X : How Does It Save My Video Editing Time? | TechTree.com
Wondershare Filmora X : How Does It Save My Video Editing Time?
Video editing could be daunting at times, particularly when the raw footage has a lot of information, and the recording is done at a higher framerate.

Video editing could be daunting at times, particularly when the raw footage has a lot of information, and the recording is done at a higher framerate. Unless you have access to a computer with highly advanced hardware components such as a powerful processor, latest GPU, significantly huge RAM, etc. your post-production experience would be awful.
Considering these issues, the following sections discuss how Wondershare Filmora X could be a timesaver for professional and amateur video editors. Here you will learn what features does Filmora X offer that could be exploited to save your considerable amount of time without giving overhead to your PC’s hardware resources, especially when the turnaround time is tight.
How Filmora X Saves My Video Editing Time?
Filmora X is equipped with a plethora of advanced features that can be enabled and/or accessed quite easily to expedite your overall post-production process. Some of the most important options among them include:
1. Proxy Video Footage Creation
Proxy videos are low-res instances of the raw footage that has been recorded in high resolution. Because the original media clip might put overhead to the graphics processing unit (GPU) and the processor resulting in frequent lags during the editing process, many professionals create proxy files.
Being of lower resolution, since these proxies do not over-burden the hardware, the Skimmer (Playhead) in the Timeline can be moved smoothly, thus enabling you to edit the clips faster. The good news is, proxies have no adverse effect on the quality of the original video. This means, when you render the edited footage, the final output is produced in high resolution.
How to Create Proxy Video Footage in Wondershare Filmora X?
You can create a video proxy by right-clicking the footage file in the Media bin, and clicking Create Proxy file from the context menu.
- Depending on the size and resolution of the original film, the proxy creation process might take some time to complete.

2. Previewing at Lower Playback Quality
Videos of higher resolution are resource-intensive, and if the quality of the clips is decreased, the consumption of the hardware resources is reduced as well. Therefore, if you experience a lot of lagging while previewing your work during the editing process, it would be wise if you decrease the playback quality.
Wondershare Filmora X allows the quality reduction up to 16 times than that of the original resolution. With that kind of deterioration, you can navigate through the Timeline and use the Skimmer quite swiftly and smoothly.
- : reducing the preview quality doesn’t have any negative impact on the final output, and the rendered video comes out to be as good as the original footage.
How to Reduce Preview Playback Quality in Wondershare Filmora X?
To reduce the preview playback quality, you can pick your preferred value from the Playback quality drop-down list present in the toolbox at the upper-right corner of the Timeline.

3. Creating Render Previews
When you add multiple filters and effects to a media clip, Filmora X eats up a lot of processing as you start previewing the video. As a result, you may experience lagging, and might end up wasting a good amount of time merely in the previewing process. To avoid such inconsistencies, Filmora X allows you to generate render previews that are temporary frames, and are displayed when you play a resource-intensive film.
How to Create Render Previews in Wondershare Filmora X?
You can create a render preview for a bulky media clip by selecting it in the Timeline, and then pressing Enter on the keyboard. Alternatively, you can also click the Render Preview button present in the toolbox at the upper-right corner of the Timeline itself.

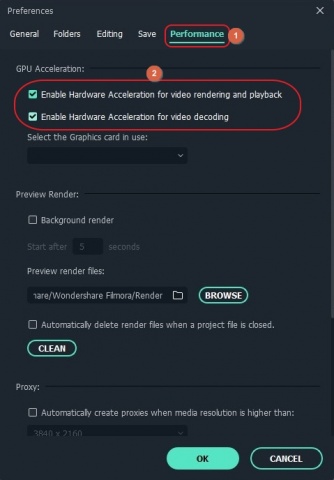
In addition, Wondershare Filmora X also allows you to enable the automatic render preview feature that creates render previews when the application doesn’t detect any activity for a specific period of time. You can turn on automatic render previews by going to File > Preferences, going to the Performance tab, and checking the Background render box under the Preview Render section. You can define the inactivity duration threshold by specifying a value in seconds in the Start after field.


4. Enabling GPU Acceleration
When you edit a video, preview the expected output, and begin rendering the project, the CPU receives a decent amount of overhead, thus significantly delaying the process. As you enable GPU acceleration, the workload on the process is reduced thus allowing the PC to function more smoothly. Because video editing is a graphics-intensive task, enabling GPU acceleration expedites your overall post-production experience, therefore enabling you to come up with the final output faster.
How to Enable GPU Acceleration in Filmora X?
After you have created a project in Filmora X and have added the media files to it, you can enable GPU acceleration by going to File > Preferences, switching to the Performance tab, and checking the Enable Hardware Acceleration for video rendering and playback and Enable Hardware Acceleration for video decoding boxes that are present under the GPU Acceleration section.

5. Enabling Auto Ripple Feature
Auto Ripple expedites your trimming and cutting tasks by automatically bringing two media clips that were fragmented during the removal of an unwanted section from a clip in the Timeline close to each other.
How to Enable Auto Ripple in Filmora X?
Although this feature is turned on by default in Filmora X, if it isn’t, you can click the Auto Ripple (Chain) icon from the top of the track list that is present on the left of the Timeline. It is also noteworthy that the same result can be achieved without enabling Auto Ripple by right-clicking an unwanted clip in the Timeline, and clicking Ripple Delete from the context menu.

6. Applying Color Match for Faster Color Grading
If you are working on multiple clips and want all of them to have an identical color grade to make the ambiance of the final video look consistent, you no longer have to apply several filters on each clip individually to get the required effect. With the Color Match tool that Filmora X has, you can choose a reference clip color grade of which you want to have on all the other media files, pick the target footage, and begin the process. It’s as simple as that.
Furthermore, Filmora X even allows batch color matching where you can select multiple clips, and apply a color grade to all of them in a single go.
How to Apply Color Match in Wondershare Filmora X?
To apply Color Match feature in Filmora, you can follow the simple steps below:
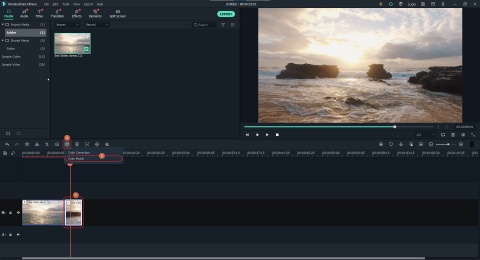
- Select the target clip in the Timeline and then click the Advanced Color Tools icon from the toolbox present at the upper-left area of the Timeline
- Click Color Match from the menu that comes down
- From the Reference section, move the playback slider to the frame with the color you want to apply to the target media
- Click Match
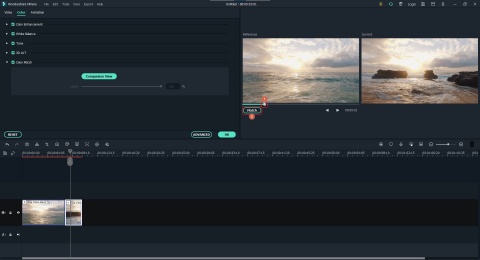
- Optionally, you can use the Comparison View slider on the left to adjust the match level for fine-tuning

7. Enabling Audio Ducking
When you are working with a video that has both voice narration and background music, you may want to keep the volume of the former higher as compared to that of the latter. The Audio Ducking feature in Filmora X allows you to get this done with the least effort, where you can select the audio track of the voiceover, and then use a slider to reduce the volume of all the other clips that the Timeline has.
How to Enable Audio Ducking in Filmora X?
- Add all the audio tracks that you want to have in the project to the Timeline and place them in your preferred sequence on different tracks
- Select and then right-click the media clip with the audio, the volume of which you want to keep high
- Click Adjust Audio from the context menu

- Check the Lower the volume of other clips box next to the Ducking label
- Use the available slider to adjust the volume of all the other, unselected clips while keeping the that of the selected one constant

8. Personalizing Keyboard Shortcuts
Keyboard shortcuts can decrease your post-production working hours. When using shortcuts, because you don’t have to switch between the mouse and the keyboard to perform even simple tasks, the video editing projects can be completed way faster.
Wondershare Filmora X has a dedicated box where you can see all the default keyboard shortcut keys, and even customize them according to your preferences.
How to Personalize Keyboard Shortcuts in Wondershare Filmora X?
To view and personalize keyboard shortcuts in Filmora X:
- Go to File > Keyboard Shortcuts. Alternatively, you can also press Ctrl + Alt + K on your keyboard

- On the Keyboard Shortcuts box that opens up next, select a category in the navigation bar on the left, and view the relevant default shortcut keys in the right section
- To personalize, click inside the field representing the task you want to modify the shortcut of
- Press a combination of keys on the keyboard to assign a new shortcut key to the function

9. Adding Animation Keyframing
New to Filmora X, keyframing allows you to add animation effects granularly and quickly, without going through the lengthy process of adding several effects on separate frames. When you place two keyframes on a media clip, you only need to add the initial and final actions on the first and the second keyframes respectively, and the rest is taken care of by the program itself.
For instance, if you want to have an object on the screen that moves from left to right, you can select the first keyframe and position the element on the left, and then select the second keyframe and move the element to the right. When you preview the footage, you can see the object moving from one end to the other pretty smoothly.
How to Add Animation Keyframes in Filmora X?
To add animation keyframes in Filmora X:
- Add the object you want to animate on a separate track in the Timeline
- Extend the visibility duration of the object by dragging its side handles
- Position the Playhead (Skimmer) over the frame you want to start the animation from
- Click the Keyframing icon from the toolbox above the Timeline to add the first keyframe

- Move the Playhead a bit forward, i.e., where you want to end the animation
- Click the Add button from the Animation tab to add the second keyframe

- While leaving the Playhead on the second keyframe, move the object to the target location on the screen to automatically create the animation effect
- Repeat the process to add more animations as needed
10. Using Motion Tracking
Motion Tracking is a feature in Filmora X that enables you to track the movement of an object such as a human being, car, ball, etc. in a footage. This feature is most helpful when you want another element like a text or an image to follow the tracked entity. Without Motion Tracking, you are required to make the elements follow the object by changing their position frame-by-frame, or by adding the animation keyframes with precise timing that again is a tedious task. Motion Tracking makes all these things simple.
How to Use Motion Tracking in Filmora X?
To use Motion Tracking
- In the Timeline, split the media to isolate the section with the object you want to track the movements of
- Position the Skimmer on the frame you want to start motion tracking
- Click the Motion Tracking icon from the toolbox above the Timeline

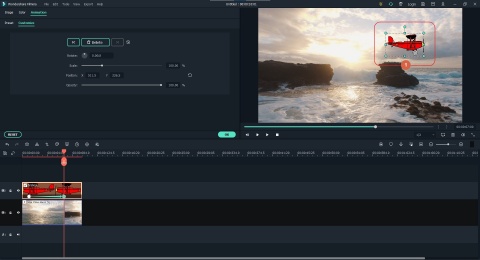
- In the Preview window, adjust the size of the tracking frame to keep the target object in its center
- Click Start Tracking from the left window

- Once the process is complete, use the drop-down list that appears next in the left window itself to pick an element to attach to the tracked object

Conclusion
Editing a video with precision and giving it a professional touch could be extremely challenging, especially if you are new to the post-production field. Therefore, the tips suggested above can be used while working with Wondershare Filmora X to expedite your task, and to deliver the final output within the given turnaround time.
TAGS: Sponsored, Video Editing
News Corner
- DRIFE Begins Operations in Namma Bengaluru
- Sevenaire launches ‘NEPTUNE’ – 24W Portable Speaker with RGB LED Lights
- Inbase launches ‘Urban Q1 Pro’ TWS Earbuds with Smart Touch control in India
- Airtel announces Rs 6000 cashback on purchase of smartphones from leading brands
- 78% of Indians are saving to spend during the festive season and 72% will splurge on gadgets & electronics
- 5 Tips For Buying A TV This Festive Season
- Facebook launches its largest creator education program in India
- 5 educational tech toys for young and aspiring engineers
- Mid-range smartphones emerge as customer favourites this festive season, reveals Amazon survey
- COLORFUL Launches Onebot M24A1 AIO PC for Professionals
TECHTREE